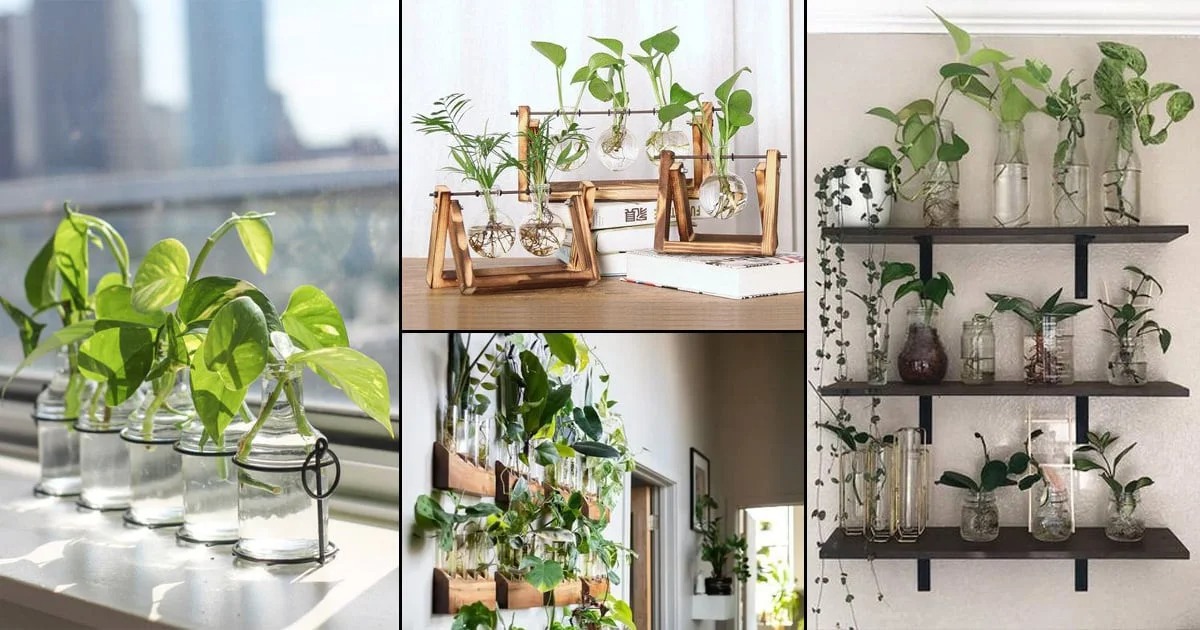
Propagation stations are, as you may know, the runner in the plant world. I have had multiplication stations made from Ikea spice rack holders and Mason jars in the past, but I find that they had first-class properties on The shelf because they were bulky. So, I was attracted to the wall propagation stations. I looked for Inspiration on Pinterest and Instagram to create my own propaganda wall. Means of stem propagation stations… more room for potted plants.
What you need:
3M Control picture hanging Strips: The Velcro appearance of these strips allows you to remove the tubes from the wall for any reason (for example, for cleaning) and reinsert them without much noise. Even if you use distilled water, you may not need to remove it as often, because the water rings do not form in the tube. All you have to do is fill in regularly. If you decide to place the tubes on another wall, the 3M strips will come off easily and will not damage your walls. I have used both the medium size and the small size of these bands and both work well, so you can choose to choose only the small size or use the size you have at hand.
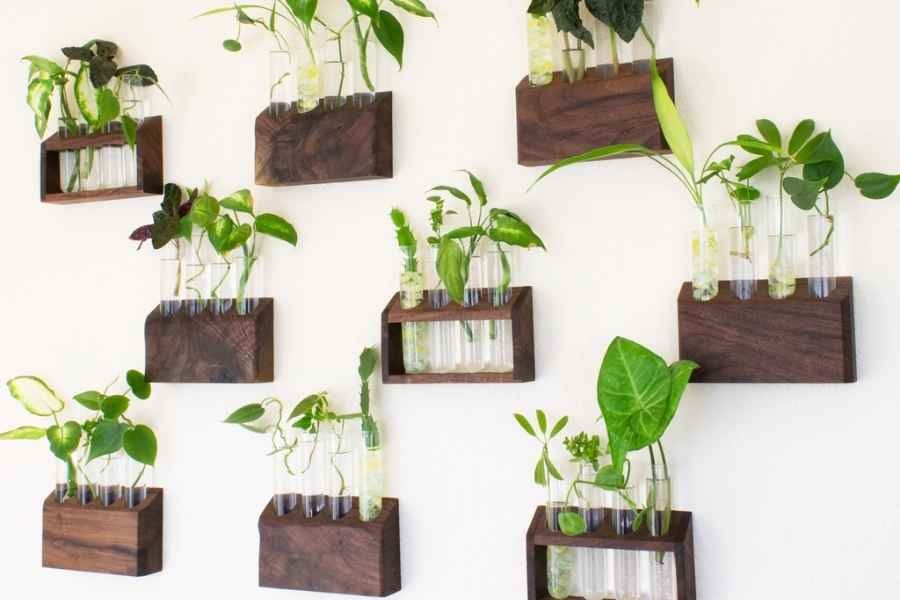
Tubes:

You can also use any glass container of your choice, preferably a light container. If your glass container is on the heavy side, I recommend using a large control strip to better support the weight of your container. It should be noted that I used the test tube with a margin of 20 mm. There were also test tubes with a 30 mm edge, but they can no longer be found on Amazon. If it is back in stock, I would recommend it because you will have a larger opening at the end and will be able to double larger cuttings or cuttings in a pipe.
Suitable wall:
Once I had the strips and test tubes in place, all I had to do was choose my wall for the spread. I have a wall about 4 feet from a southwest window. This wall will probably receive a medium to low light that I have chosen. I have another wall near a north-facing window that might work just as well and could use that wall in the future. Whichever wall you choose, make sure that it has enough light for your cuttings. If you have grow lights, you can choose almost any wall.
Method:

It was quite easy to do. If you want a perfect-looking wall, you need to be meticulous with its measurements. On the other hand, if you are like me and 2 children are screaming and striking at your feet, then you can opt for the Eye-Balling method–which I did too. I chose the place where the first tube should go, then I looked further from where the following tubes would fit. Have fun with this by choosing different models to place the tubes.
It took less than 15 minutes (and 30 minutes to an hour to look at the wall and appreciate my manual work). I really like how it turned out.Speaking of damaging the walls, I had used a mix of 3m tapes and the dollar store years ago to hang pictures on this wall, and by removing the dollar store tapes, they were damaging the wall. In the image below on the wall there are 2 places where the paint has come off (the other is covered with a test tube). I decided to leave the other dollar store strip in place until I found a way to remove it without further damage. However, the 3M control strips came off beautifully without damage. Therefore, I strongly recommend that you use this brand or a similar brand with the same quality. In any matter, not inexpensive and get dollar store tapes, otherwise you may have damaged walls. You can detect damage to the wall. It is longer than the cropped image shows.

